F1 Manager 22 – How To Get 100% Setups The Easy Way!
setups are basically cheats in f1 manager 22. they boost your driver’s stats quite significantly massively they really help you win races so if you can nail the setups in f1 manager you’re going to do so much better in the races and i’ve got good news for you it’s not rocket science i’m gonna show you in this video how to get a hundred percent optimized setups that are gonna massively boost your driver’s stats for quality and the race so without any further ado let’s get into it and let me show you how to start it starts
with free practice one so therefore what we’ve got to do let the weekend begin okay so here we are at the beginning of the weekend and you can see our performance bonus is 0 out of 15. now this isn’t the bonus that you’re going to pay your drivers in cash you want to maximize this bonus because there’s 15 driver points available here so if you look on the right inside that bonus distribution if we can get that up to 15 or anywhere near 15 it’s going to allocate those points to the driver’s ability your drivers
will drive better with a better setup that’s the critical part of it so how do you get 100 setups let’s have a look let’s go to max
know circuit with lots of long straights and it’s really minimizing stuff for that it’s not gonna work this this is a mini game and i think when you understand it in that concept it becomes a lot easier so we have these blue bars and the optimal setup is within these blue bars so for your first practice session as long as you are setting your markers within the blue bars as i’ve done for max it’s absolutely fine because we need max to go out there and we need him to give us feedback on the setters and
let us know how close we are so it’s very important that you do enough laps for max verstappen to give you that feedback and i recommend going out and doing 20 lap stints and as soon as max gives us the feedback we’re going to pull him in so same with perez again so all you’ve got to do for fp1 i’m going to explain by the way a lot of the intricacies of how to maneuver these um markers within the blue bars because there’s some really important kind of fundamentals on the sand here particularly with the
rear wing and the front wing and but for the first fp1 session we’re just going to get these markers within the blue bars and we’re going to get a sergio to give us a bit of advice and let us know if it’s good if it’s bad or if you’ve already summed across optimal so again i’m going to amend the run plan for sergio to do 20 laps that’s going to give him enough time to give us the feedback and then we’re going to pull him in right so going forward to the track really really easy
all you’ve got to do is send out your drivers and fast forward and i’m going to show you how they give you the feedback it’s not really obvious in the game opening up the trap mat now so here we go have a look here can you see the setup confidence there are some uh chevrons and uh question marks here for the drivers to give you full feedback on the setup they need to complete all of those chevrons see at the top there as well there’s a speech bubble with one out of five so there’s five
things to complete so you can see both drivers have already given us one of those five and as soon as they hit five out of those five they’re gonna speak with the engineer and give some feedback on the setup in game and when we pull them in which we’ll do immediately once we’ve got that five out of five then we can actually have a look at the exact percentages let’s do that we’ve zoomed forward and we can see max is about to give us that five out of five here we go everything okay so verstappen’s
already happy with the car and i’m immediately gonna call him in because we want to have a look at the numbers so there’s no point here really going around at this stage going around there are circumstances where you do want to go around by the way i’ll let you know later on and by the way if you’re enjoying this video please please please take a moment now to just stop like the video and subscribe if you want to see more f1 manager please please please it makes my day and i would love to grow this
community right here we go here is the feedback from massaman and he’s already 90 confidence with the setup we did a good job in kind of guessing really where to put the markers and this is the next bit to do so first of all because this is the only feedback we’ve got so far you can see the current markers are going to be the same as the previous and the best as we move on it’s very important to see the current previous and best and we’re going to adjust according to those but all we want
to do here really is move our markers a little bit different to where we had before and we want to see whether that makes a setup better or worse so again it’s not about now getting the 100 right now we need a little bit more feedback so we’re in a good place we’ve got 90 is a fantastic starting place and we’ve now just moved the markers a little bit off where they were to see how max is going to find that so i’m going to send him out again on another 20 lap stint as soon
as he’s done i’m going to call him in you can see it takes a bit of time to reconfigure but that’s happening perez has come in now and perez has only got a 64 now it doesn’t really matter at this stage i have to be honest don’t be disheartened it doesn’t matter if it’s 90 or 64 or 30 or whatever you just got to move the markers now a little bit away from the previous ones because we want to get some information about whether it’s better or worse to move the markers in that way so
make sure you keep them within the blue bands because we know the optimal setup is going to be within the blue bands there might be a way to hack this by the way i think in just going really extreme on the minimum maxing um but that is really formulaic so if you if you want to chat about that let me then discord but here we go you see i’m moving these markers and it’s at this point i want to let you know there are only two um car set up uh options that affect the straights
set up and that is from angle and rearway angle and rearing angle is very very very uh harsh in the way that it changes the setup so if you want to change a setup i strongly suggest starting with rear-wing angle and then front wing because once you’ve done those two you’re not going to be able to adjust your straight setup anymore and then you can adjust the rest i’ll show you how to do that later in the video right send them out again let’s zoom forwards and now they’ve had enough time perry’s on the radio
what’s he going to say very very very bad and this is actually fantastic information for us that is going to be super super super helpful to see why the setup has gone bad here’s max how’s the balance and max is happy but max online said before that’s very interesting actually so let’s go look at perez and we can see now that the optimal bars have shrunk and some of our markers are now outside the optimal bands that’s quite easy to work out now because our straight setup is outside of the optimal we need to start
with the rearing angle and the front wing angle because once you’ve adjusted those two you cannot affect the straight setup at all and you won’t be able to get 100 set up if you’re not bringing that straight within the optimal band now what i’m about to tell you is really the key bit for setups this is the secret source and when you think about it as a mini game as i said earlier this is why it’s easy to conceptualize where are feedback is bad we want to move our marker kind of as far away from
where we were previously and still be within the band does that make sense because we know the feedback was bad we know we’re way off so we want to explore the other side of the optimal band and you’ll get a feel for how much the optimal bands drink later on by fp3 they’re going to be re shrunk you know quite a lot um but we want to move to the other side of the band so you can see here where is bad i’m gonna try and move the other side where it’s already great we don’t
need to move that much we can move the marker a bit closer and this is why understanding that you know rearing angle is quite significant changes and then you use front wing angle to really kind of adjust the oversteer in the straights and then tyre camber is quite a minute one and toe out is you know very limited in what it does that is really important but you basically want to maneuver these markers so if your setup feedback was bad move it away and if your setup feedback was great or optimal if it’s optimal you
kind of want to keep it there there we go so we’re going to put perez on a new set of tyres now because he can’t go out and do those um so he might not be able to get the full feedback in this run but we’re going to keep him out there because we also want to get acclimatized to the track and the new parts now max has come in and the setup has gone down actually so it’s 81 previously 90 before but you can see we’ve got an optimum at the top when you’ve got
the optimal you’re on a really really really good streak here because we know that that green band between the green band and the uh previous at the top there that is where optimal is going to be so we’re absolutely set there and the rest you know good we now making smaller changes smaller changes with max’s car but as you’re going to see here it doesn’t really matter whether you’re coming in an fp1 with really low setup confidence it’s just about getting that feedback because i’m going to show you here this is what happened next so
we’re in fpt now we’re in the next session halfway through and paris is about to give us his feedback and let’s see what perez is going to say here for his 5 out of 5. maybe the next game we can play at is goat simulator at me silent but he means it’s perfect the setup is perfect it’s optimal now it’s not a hundred percent perfect as we’re gonna see but it’s pretty pretty pretty close let’s bring him in and have a look now you can see here we’ve got 99 set up so just about moving
those bands we were able to highlight the optimal or land on the optimal part of the setup and you can see the only bit here that we need to improve to get to get 100 is breaking stability now this is a bit where it’s really critical to understand how the front ring rear angle tyre camber etc affect things so you don’t really want to be making changes to rearing angle here that’s going to be too harsh so now you want to be adjusting the more minute settings and we want to be keeping our markers exactly
where they were for in this instance both previous and best because previous and best for calling traction straight is optimal so we’ve done that here and we’re just going to try and move the one that is not small and we’re going to put him on a new set of tires and send them out for another run so you see here reconfiguring and pairs will go out again let’s see what max is going to say here’s matt’s coming on the radio remember max was really really happy early on he had 90 earlier on so we’re now
still in like an experimental gathering phase with max the stage we want to find more optimal bands and then we can bring them all together so at this stage it doesn’t matter about having 100 set up right now really for max we’re still trying to find optimal bands and you can see here that we’ve retained two but we’ve actually lost one so the setup um has gone down from 93 was the highest and again similar to checo we can see at the top it was the oversteer i believe that is only good so the overs
again that philosophy of treating like a minigame we will for good we want to move our marker quite far away from where it was previously and more towards the optim the previous best that’s what we want to get to for the optimum ones like breaking stability and traction we really want to keep them where they are so now it’s the case of manipulating the markers to get breakability and traction where they were we want to get over to the furthest away and for calling them straight we want to move them a little bit away let
me know in the comments by the way if that doesn’t make sense if you have any questions about f1 manager let me in the comments i’m streaming this game all the time you can join in the streams we have a discord with 2 000 people that you can join and if you want to grow the community elected subscribe to the channel please please please i’m just a guy doing this in my spare time but absolutely love this stuff right let’s move forward and see how the feedback was for these setups here we go in fp3
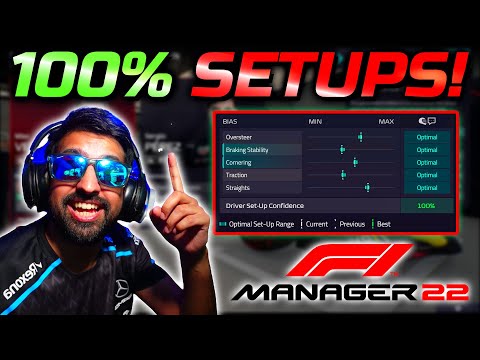
max is about to give us feedback and it is optimal for max he absolutely loves it he’s over he’s overcome with joy so we did that tweaking and we’ve managed to get it basically optimal for all of them let me show you exactly what that looks like and here we go 97 for matt’s 97 now i am going to show you 100 in this video because that’s 97 for max it was just the oversteer i think we couldn’t quite get into autumn we went to great you see how close the band gets at the end
so by the end you kind of you really know where you need to be like it’s not rocket science but here’s a hundred percent here’s perez in the same setup and you can see here we got the hundred percent highest confidence set up and that is going to give 13 of those performance bonus points he’s going to get 13 extra driver points optimal all the way and you can see how i did it is is treating it like a mini game it’s not thinking as when i started this game i was thinking okay i want
to have more cornering here i want to have more traction out of the corners it’s you know barcelona it’s more about calling this race that’s not the way to approach it it is about getting those markers and using the current previous and best once you think about in that language you will get 100 and you will get that performance bonus and i’m going to show you how that allocates the driver’s points have a look so here we go look on the right-hand side of the performance bonus this is absolutely insane look at the point as
we’re getting it’s really hard to get these points in criminal if you play fifa this is basically like applying the chemistry and the training cards in previous games it just makes your drivers op i mean sergio perez is now like goat here like legendary driver look at that and we’ve got 14 out of 15 because i think the car parts knowledge isn’t quite high enough but you can see so much is to do with the setup so i really hope you enjoyed this video if you didn’t understand thing or probably i explained anything poorly please
let me know please make sure you subscribed and i’m doing this as a series you’ll see other videos like this in the playlist but again let me know in the comments really hope you enjoyed it give me any feedback how i can make these videos helpful or better i’ll see you see you next time good luck in your managing