Product review, Mobile Thermal Imaging Camera, Power Device Fault Detect TOOLTOP T7
Hello everyone, friends, we have not done a product review with you for a long time. In this video, we will examine a thermal camera together. As you can see, we have a small thermal camera. The box is like this. Let’s open the contents of the box and start examining our camera together. Friends, when you open the box, the camera comes out like this. There is a small technical guide here. You can see the information like this. Our camera is here . It brings it closer to the screen so that you can see it. Friends, it
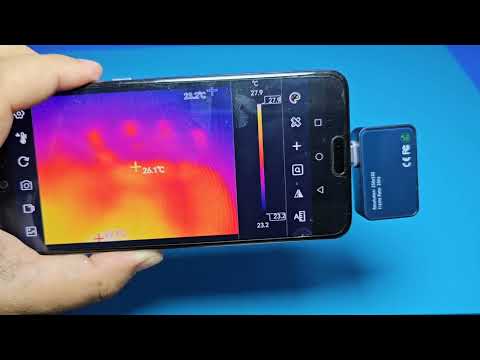
comes in a nice case, even though it is difficult to take it out of the box, let me tell you, you will succeed in the end. Our camera is here. Friends, you can use it by plugging it into your mobile phone. It has a TY interface and is available with OTG supported mobile phones. You can use it, it has a very small and compact structure, now let’s connect it to our mobile phone, then we will start testing it. The back of the camera is like this, friends, you can see the frequency and resolution here .
These are very good values for an infrared camera. After saying these , let’s connect the mobile phone now, from the type C interface here. This device
connection here, you open the application from here . There is no more, the application starts to work automatically. As you can see, our camera has started to work now. Friends, it is now active and infrared detecting the temperature in the environment and we see the temperature information. Now you can see the silicone pad. As you can see, I put my hand on the silicone pad. And after taking my hand, the temperature left by my hand on the silicone pad. Normally, when you look at it with your eyes or a camera, you cannot see anything. It
sees the temperature change here very sensitively. Where can you use this device? You can use this device, especially in the repair of motherboards or circuit elements that get hot on electronic cards, or to find roads that get hot due to more load on a PCB. It is a nice camera that will be very useful especially in troubleshooting and it has a very good sensitivity . Now I want to continue to show you by testing the camera in a dark environment. I am currently in the corridor of my house, friends , I deliberately left the light
dimmed and turned off. Normally, you do not see anything. Look, when we look at our infrared camera, it is like this: The radiator is closed, but you can see the hot water pipes and heating installation pipes passing next to the radiator. Normally , this is the image, but when you look at it with the camera, you see it like this. Of course, when the radiator starts to heat up, this image will start to change. Additionally, it becomes possible to see the temperature information from different points. You see it’s dark at night. There’s no light. When
I look at it with a thermal camera, I can see the temperature of the plumbing pipes passing through the ground. I can see where the plumbing pipes pass and what temperatures they are at. Look, my footprints are visible on the ground. Normally, this is the image. These guys, you can’t see anything right now, it’s dark outside at night right now. The kitchen is pitch dark, but when you look at it with a thermal camera, it looks like this. I’m showing the refrigerator like this. Friends, you can see the points where it gets heated. I left
a gap above for the hot air to evacuate. From there, we can see that the hot air coming from the back of the refrigerator is evacuated. It’s a camera that works very well right now. I was in the room, now I opened the radiator and the hot water slowly started to flow towards the radiator. Let’s watch this through the thermal camera and see what kind of air flow it is. More precisely, it will be a hot water flow. I gave the radiator some time to warm up. When we look at it with the thermal camera,
we can see that it is starting to warm up like this. Also, as I said. from different points We can get temperature information. For example, my window is currently 15.4 degrees. The hot air coming out at the top of the radiator is around 28 to 30 degrees. We see that the point where the radiator valve is located is approximately 40 degrees. Friends, my radiator in the shape of a half moon has heated up. In fact , the honeycomb would be much more effective if the inlet pipe at the bottom was on the other side. I
think it works because the hot water tries to return to the nearest route. In this way, we can see that the radiator is getting heated . By using this device, you can find the places where there is heat loss in your home. You can see the problems in the radiator. You can find where the pipes in your installation pass. Friends, it is a very useful and enjoyable device to use. Friends, I want to look at the city with this device. Frankly, I’m curious about what kind of view it looks like in the city. Let’s try
it together. Friends, I am shooting this video at night when the temperature difference is high. Everyone is sleeping now. It is late at night. The city looks like this. We are looking at the city with a thermal camera. Friends, when we look at it with a thermal camera, it looks like this. Look, the trees are relatively It’s warmer, again, I can get different temperature information in different parts of the city. Normally, our image is like this. When we look at it with a thermal camera, it looks like this. I wish the barking dog was nearby,
can we detect it? There is a garden there. I’m looking to see if there are any living creatures in this garden. Look. There is a temperature difference at these two points, but I don’t know if there is a living thing there or if it is a puddle. Friends, the city looks like this. Let’s look at the sky from the thermal camera. Normally, this is the situation, and when you look at it with a thermal camera, it looks like this. The temperature difference of the clouds makes the clouds look like this. We can see it well.
Normally, it looks like this on the camera. Look, there is a plane over there . I was wondering if we could catch it. But I can’t see anything. Guys, we couldn’t detect its temperature. Now let’s take a look at the working computer. This time, we look at the computer using the camera. Guys, there is a temperature at the bottom of the screen. There is a wave again because the processor is on this side, you can see that this area is hot. I will do a RAR on the computer, that is, I will use the processor
to the fullest. We will try to see the heat wave coming from the fan outlet here. Let’s see together, now the processor fan has started working. Look , you can see the temperature emanating from the air outlet here. The temperature is approximately 27 degrees and this temperature is gradually increasing. Friends, I am currently using the processor at a rate of %. When we use it at a rate of 10000%, of course, more heat will come out from here. You can see that this part of the keyboard also gets hot. I am showing the product in
outline in this way, friends, so we have completed our review video. For those who want to buy this product, you can find the purchase link in the description section of the video, so we have completed a review video. Until we see you in our next video and project. Goodbye for now.